Getting Started
If you are new to coolOrange powerJobs, we recommend beginning with the following resources:
powerJobs Processor – Getting Started: Learn how to build PowerShell-based automations on the Job Processor.
powerJobs Client (powerEvents) – Getting Started: Learn how to customize Vault Client and Inventor on workstations.
Both the powerGate Processor and powerGate Client setups include the required powerJobs components as well as powerAPS.
So, no matter which side you want to enhance, powerAPS makes it easy to consume Autodesk Platform Services (APS) in your PowerShell scripts.
All you need to get started is a valid Autodesk ID. No extra configuration is required.
Sign in with your Autodesk ID
Make sure you’re signed in with your Autodesk ID on your Vault workstation.
If your Autodesk Vault or Inventor licenses are already assigned through the Autodesk account, you’re ready to go without any further setup.
Otherwise, sign-in once on the machine using your Autodesk ID and password via one of the following:
Vault Client or Inventor: Click Sign In in the upper-right corner of the product window

Autodesk Access: Click the avatar in the upper-right on the title bar.
More info on Autodesk Access
On the Job Processor
Jobs can run on the Job Processor in two ways:
Impersonation - meaning all Autodesk Platform Services (APS) requests are made on behalf of the user who submitted the job.
No Autodesk ID sign-in is needed on Job Processor machines.
System user - Jobs send APS requests as a dedicated Autodesk ID.
Start powerJobs.exe and click Sign In to Autodesk Account.
Consent
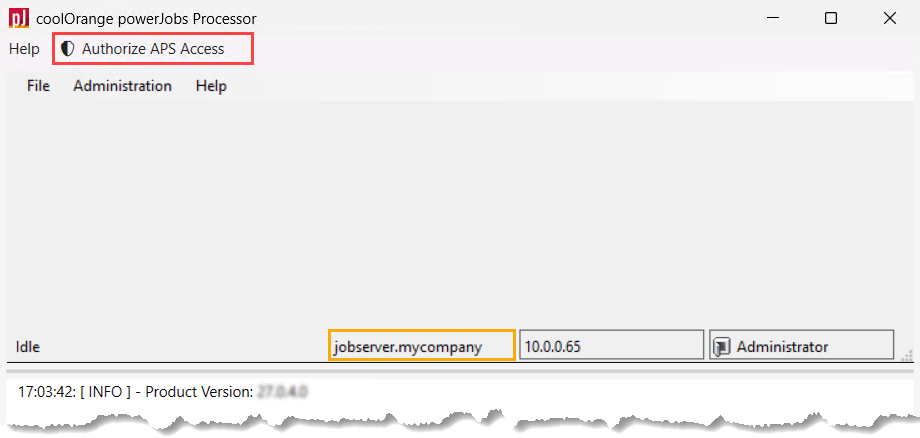
Consent must be granted once by the signed-in admin account. Click Authorize APS Access to allow access for the coolOrange app.
The session is then automatically renewed each time a job connects to APS.
However, if no jobs are executed for 15 consecutive days, the consent expires. Click “Authorize APS Access” again to renew it.
Whitelisting the Client ID for Autodesk Products such as Forma, BIM 360, and Fusion Manage
If your Autodesk ID has Project Member Access to Fusion Team projects, powerAPS can access the authenticated user’s data automatically.
For other Autodesk products, additional setup may be required. For example, whitelisting may be necessary for certain hubs to appear in the results returned by the APS Hubs API.
The following Autodesk services require your system administrator to approve the coolOrange app’s Client ID to enable access:
Login to Autodesk Forma as an admin.
Navigate to Account Admin > Custom integrations.
Click the Add custom integration button:

In the Autodesk Platform Services Client ID field, enter
baEth24w4YXeBoGYvrdKTHlAi2HfvYtLabmmX0Hxwh047KuO: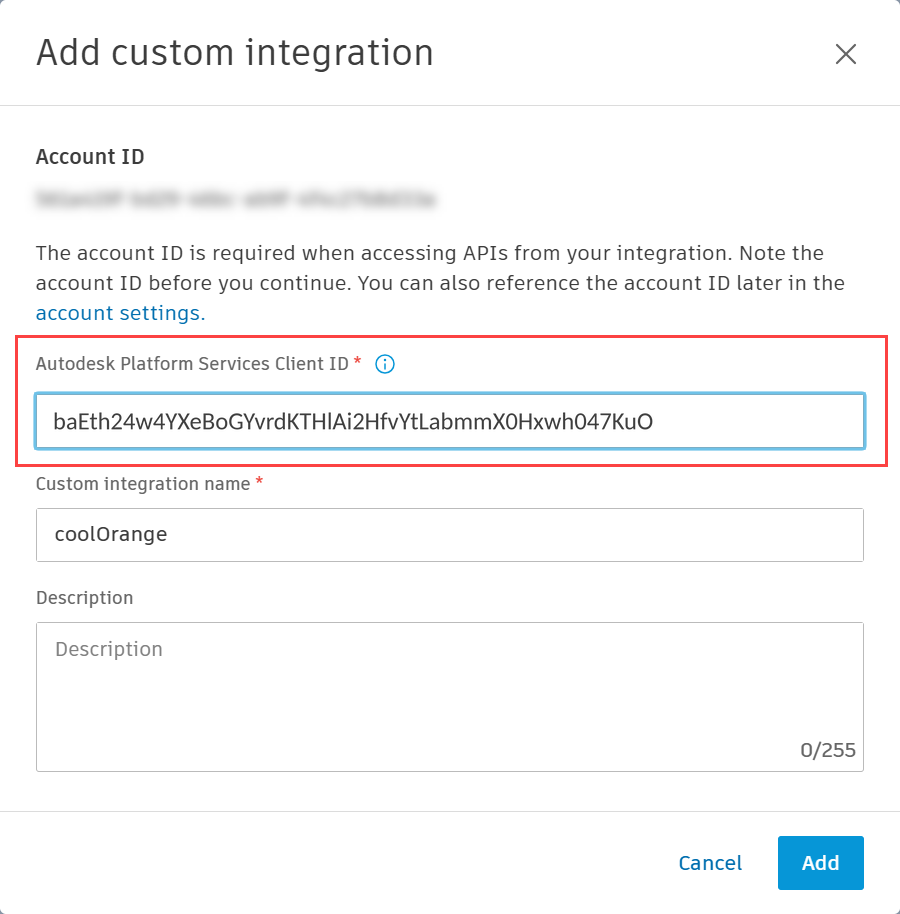
Select a descriptive Custom integration name, e.g.
coolOrange.Click Add to save.
For more details, see the official Autodesk Forma documentation.
Login to BIM 360 as an admin.
Navigate to Settings > Custom Integrations:

Click the Add Custom Integration button.
Keep all Access options checked, and click the Next button.
Check the I’m the developer option, and click Next again.
In the Forge Client ID field, enter
baEth24w4YXeBoGYvrdKTHlAi2HfvYtLabmmX0Hxwh047KuO:
Select a descriptive App name, e.g.
coolOrange.Finally check the checkbox next to your BIM 360 Account ID and click Save.
For more details, see the official Autodesk BIM 360 documentation.
powerPLM provides dedicated PowerShell cmdlets for Fusion Manage.Follow the powerPLM Getting Started guide to configure access to your Fusion Manage tenant, including the required Client ID whitelisting.
The coolOrange app gives access to all free APS endpoints and also supports Autodesk Passthrough Billing, allowing the use of premium APIs depending on your available APS capacity:
Based on your Autodesk subscription and licenses, some API usage may already be included. For more information, see APS pricing.
Alternatively, you can create your own Autodesk app and whitelist its Client ID. The same whitelisting steps apply; simply use your own app’s Client ID instead of the coolOrange Client ID.
Ensure Autodesk Product Access
To use some APS endpoints such as Forma, BIM 360, or Fusion Team, your Autodesk ID must have the appropriate permissions and product licenses assigned.
Your Autodesk account administrator or contract manager must enable the necessary product access for all accounts in use (e.g. Build, Takeoff, or Docs).
Connect with Autodesk Platform Services
You’re now ready to start scripting against APS endpoints using PowerShell.
Simply open the PowerShell IDE or editor of choice. The powerAPS module now provides cmdlets that allow you to authenticate and connect APS endpoints.
The module is generally imported automatically when you run one of its cmdlets.
The Connect-APS Cmdlet automatically uses the current Autodesk ID login on your machine. It provides access to all available Hubs via the $APSConnection variable:
# Authenticate with APS using your current Autodesk ID; on workstations a browser might open to complete the consent process
$connected = Connect-APS

$global:APSConnection.Hubs
<#
John's Hub (note: personal A360 hub)

John's Team (note: Fusion hub)

build_JohnsCompany (note: Forma hub)

Id             :
HttpStatusCode : 403
ErrorCode      : BIM360DM_ERROR
Title          : Unable to get hubs from BIM360DM EMEA (on European Server)
Detail         : You don't have permission to access this API
AboutLink      :
Source         :
meta           :

#>
Calling other APS REST Endpoints
The $APSConnection.Headers property provides the 3-legged OAuth access token, which can be used to call a wide range of APS REST endpoints — such as Data Management APIs, Autodesk Forma APIs, and Fusion Manage APIs —
using PowerShell’s built-in Invoke-RestMethod cmdlet:
$hub = $APSConnection.Hubs["John's Hub"]

$response = Invoke-RestMethod -Method Get -Uri "https://developer.api.autodesk.com/project/v1/hubs/$($hub.id)/projects" -Headers $APSConnection.Headers

foreach ($project in $response.data) {
    Write-Host $project.attributes.name
}