Getting Started

If you are new to powerPLM, this page helps you to get started with the cmdlets and shows how they can be used in workflow jobs that run on the Jobs Processor.
Prerequisites
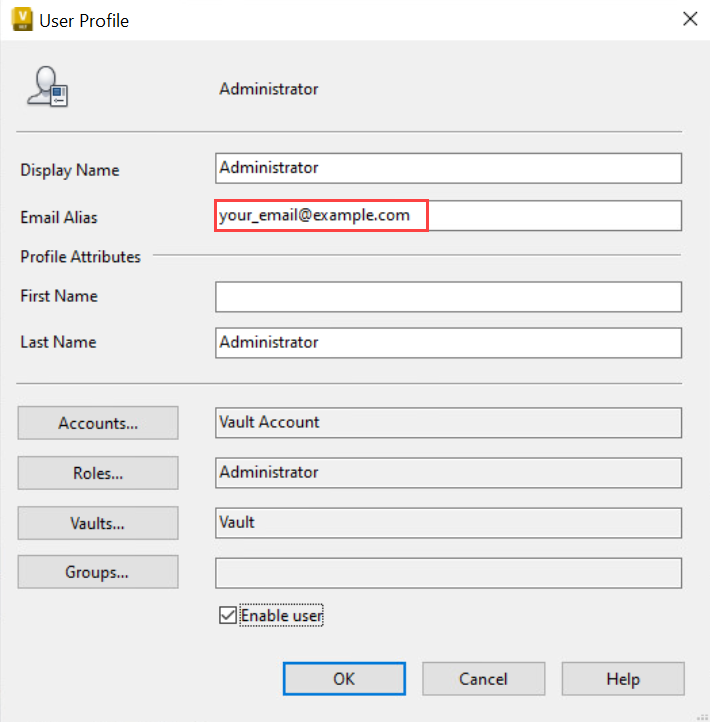
To ensure powerPLM acts on behalf of the correct Fusion 360 Manage user, the email address of the Vault user who submits the job must be configured in the Vault user profile:
The same email address must exist for the corresponding Fusion 360 Manage user:

Also make sure your Workspaces are configured as described in the Configuration in Fusion Manage chapter before continuing.
Create and Whitelist your Autodesk App
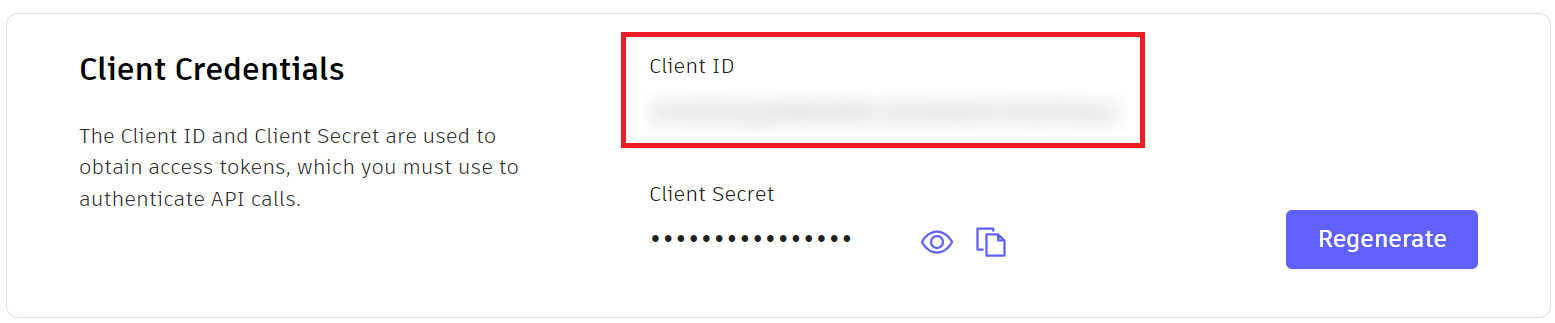
Create your own Autodesk App to obtain a unique Client ID and Client Secret.
The Client ID must be whitelisted in your Fusion 360 Manage tenant to allow background access (2-legged authentication).
Steps:
Copy the Client ID of your Autodesk App
Go to your Fusion Manage Site, click the burger menu on the top left -> Administration -> System Configuration
Click on the General Settings link
In the section Security Settings, add the Client ID to the Whitelist:
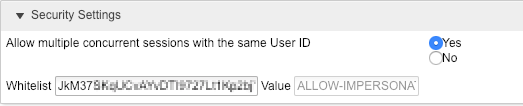
Change the setting “Allow multiple concurrent sessions with the same User ID” to Yes.
Click Save
Using the Cmdlets
Start the PowerShell environment
To get started, simply open any Windows PowerShell IDE. The powerPLM module now provides cmdlets that allow you to interact with Fusion 360 Manage.
The module is generally imported automatically when you run one of its cmdlets.
Alternatively, you can open the powerPLM Console shortcut in the start menu, which executes Import-Module powerPLM for you.
Connect with Fusion 360 Manage
Find your tenants name by copying the first part of the URL from your browser, after you sign in to your Fusion 360 Manage Site.
For https://previewcoolorange.autodeskplm360.net/plm/mainDashboard the tenant name would be previewcoolorange.
Now you can authenticate using Connect-FLC and the Client ID and Secret of your Autodesk app.
$connected = Connect-FLC -Tenant 'your_tenant_name' -ClientId 'your_client_id' -ClientSecret 'your_client_secret' -UserId 'your_email@example.com'
Get multiple items from Fusion 360 Manage
After successfully connecting to the Fusion 360 Manage tenant, you can start using the cmdlets to interact with items in the different workspaces.
To retrieve items from a Fusion 360 Manage workspace you can use the Get-FLCItems cmdlet.
Note
Get-FLCItems has the optional parameter -Filter that allows you to specify a string in the same format as Fusion 360 Manage searches to filter the result.
Get all items from the workspace Products that are in the workflow state Concept and have a field named Number with the exact value 900-00010:
$items = Get-FLCItems -Workspace 'Products' -Filter 'workflowState=Concept AND ITEM_DETAILS:NUMBER="900-00010"'
Update a Field of an Item
One of the previously retrieved Fusion 360 Manage Items can now be picked and updated using the update-flcitem cmdlet.
By navigating to the Workspace Manager in Fusion 360 Manage we can find a Item Details Form that provides us a list of possible Item Details Fields that can be edited.
In following example we edit the value of a simple Text Field with the name ‘Description’ by just extending the value with a suffix.
$itemToUpdate = $items[0]

$itemToUpdate| Update-FLCItem -Properties @{'Description'= "$($itemToUpdate.Description) - Edited"}
After executing the Cmdlet, it will return an Item with the updated ‘Description’ Field.
From Cmdlets to Workflow Jobs
Once your script works interactively, you can run it automatically on the Job Processor.
The following example shows a simplified structure of a job script that connects to Fusion 360 Manage and updates one item.
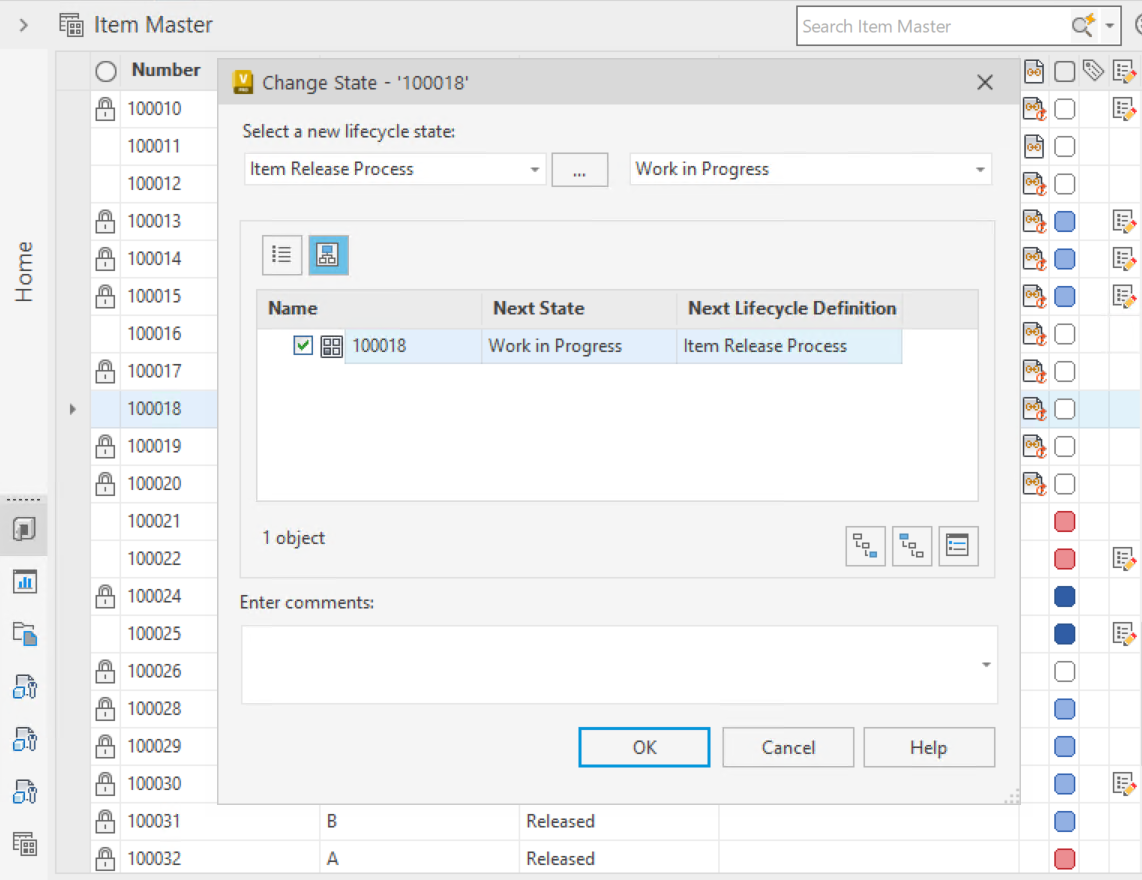
In this case, the Item in Fusion Manage is updated under the name of the user who releases the Item in Vault and queues this job.
# JobEntityType = ITEM

$connected = Connect-FLC -Tenant 'your_tenant_name' -ClientId 'your_client_id' -ClientSecret 'your_client_secret' <# -UserId #>
if (-not $connected) {
    throw "Connection to Fusion 360 Manage failed! Error: `n $($connected.Error.Message)`n See '$($env:LOCALAPPDATA)\coolOrange\powerPLM\Logs\powerPLM.log' for details"
}


$items = Get-FLCItems -Workspace 'Products' -Filter ('workflowState=Concept AND ITEM_DETAILS:NUMBER="{0}"' -f $item._Number)

$itemToUpdate = $items[0]

$itemToUpdate| Update-FLCItem -Properties @{ 'Description'= "$($itemToUpdate.Description) - Edited by job for Vault Item $($item._Number)" }

#...
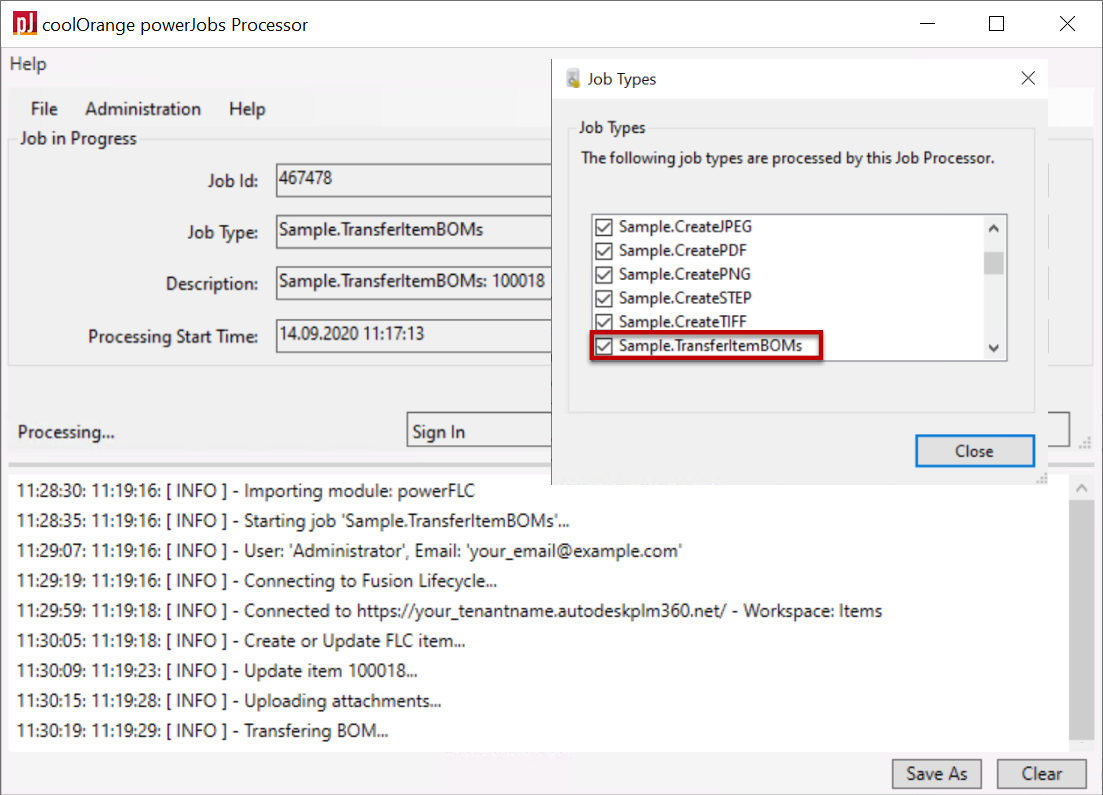
Save the script to the location %ProgramData%\coolOrange\powerJobs\Jobs\Sample.TransferItemBOMs.ps1.
GitHub
A full working version of this Sample.TransferItemBOMs job is available on GitHub.
It shows how Vault Item metadata, attached Vault files as well as Bill Of Material information can be transferred to Fusion 360 Manage.
Additional samples cover common scenarios and serve as a base to create custom workflows based on coolOrange powerJobs.
Running the Job in powerJobs Processor
To queue a workflow job you typically:
Configure a Vault lifecycle state transition to submit the job, for example using the powerJobs Settings Dialog.
Submit jobs regularly at scheduled Intervals.
Implement a client-side PowerShell customization using the
Add-VaultJobcmdlet
Make sure to start the powerJobs.exe at least once so that the new workflow job type is automatically registered and the queued jobs can be processed.